
Introduction
Can’t find hidden files in Windows 11? Some files and folders may be hidden from view rather than deleted. Fortunately, you can reveal them without installing extra software. This guide covers 7 easy ways to find hidden items using File Explorer, Folder Options, Command Prompt, and PowerShell. You’ll also learn how to locate hidden folders on USB drives and make specific files visible again.
Whether you’re troubleshooting missing documents or checking a folder, these methods can help you find what you need. Follow the steps carefully, and learn how to show hidden files while keeping important Windows system files safe.
What Are Hidden Files in Windows 11?
Hidden files are files or folders that Windows does not display in a standard File Explorer view. A file may be hidden because an application needs it, a user changed its properties, or Windows uses it to store configuration information.
For example, a program might keep its settings in a hidden folder inside your user profile. Windows can also mark important operating system files as both hidden and system files.
There are two important distinctions:
- Ordinary hidden files: Files and folders marked with the Hidden attribute. You can usually display them through File Explorer.
- Protected system files: Files Windows protects because changing or deleting them could affect the operating system. These may require a separate setting to display.
A hidden file is not necessarily deleted, encrypted, or damaged. However, if a file is missing unexpectedly, do not assume it is hidden. It may have been moved, deleted, or affected by a storage problem.
How to Show Hidden Files in Windows 11 File Explorer
File Explorer is the easiest way to reveal ordinary hidden files. You do not need administrator access for this basic method, and you can reverse the setting whenever you want.
Show Hidden Items from the View Menu
Follow these steps:
- Press Windows + E to open File Explorer.
- Open the folder where you expect the missing files to be.
- Select View on the toolbar.
- Choose Show.
- Select Hidden items.
Windows should now display ordinary hidden files and folders in the current File Explorer view. Hidden items often appear with a faded or translucent icon, although their appearance can vary.
If you still cannot find the file, check the folder’s contents carefully and confirm that you are looking in the correct location. You can also use the search box in File Explorer to search for the filename.

Show Hidden Files in a Specific Folder
You do not need to change the setting separately for every folder. Once Hidden items is enabled, File Explorer can display ordinary hidden items in folders you browse.
To check a particular folder, open it after enabling the setting. Look for faded file or folder icons that were not visible before.
If you are trying to locate a specific item, use the search box in File Explorer and enter its name or part of its name. Remember that a search may not find files you cannot access, files on disconnected drives, or files that have been deleted.
How to Show Hidden Files Using Folder Options
Folder Options provides another way to manage hidden-file visibility. This is useful if you prefer the traditional Windows settings window or cannot easily find the View menu option.
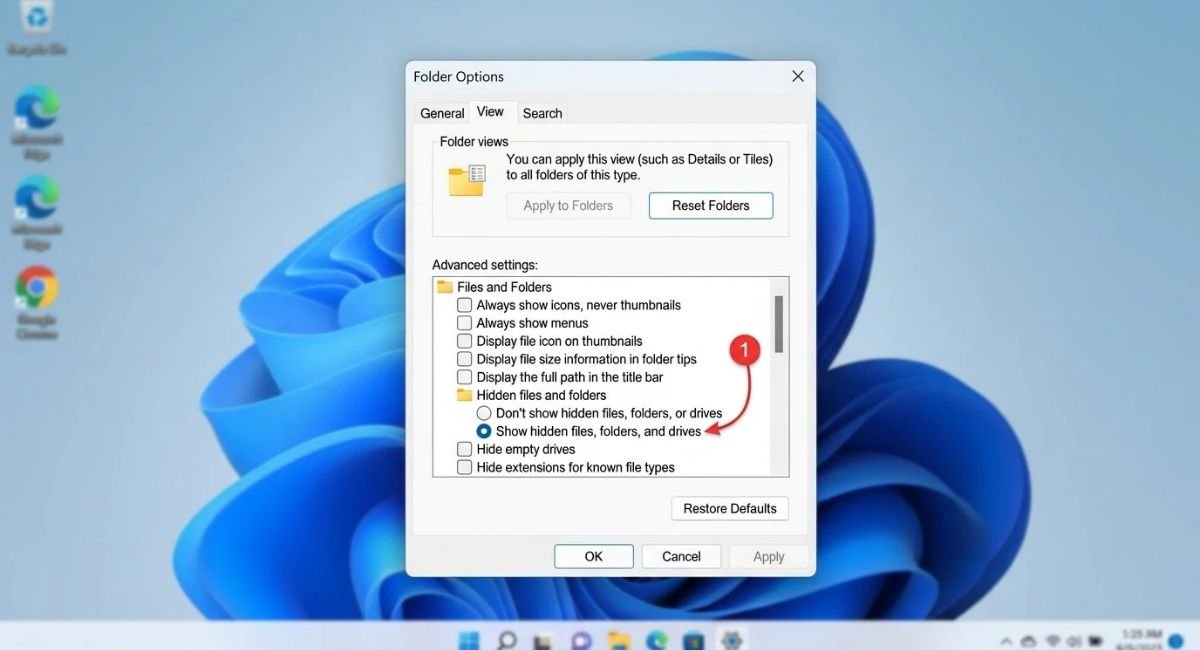
Enable Hidden Files Through Advanced Settings
- Open File Explorer with Windows + E.
- Select the three-dot menu on the toolbar.
- Choose Options.
- Open the View tab in the Folder Options window.
- Under Advanced settings, find Hidden files and folders.
- Select Show hidden files, folders, and drives.
- Select Apply, then OK.
File Explorer should now display ordinary hidden items. If you want to reverse the change later, return to the same setting and select Don’t show hidden files, folders, or drives.
Use Control Panel to Open File Explorer Options
You can also reach Folder Options through Control Panel:
- Open the Start menu and search for Control Panel.
- Open Control Panel.
- Set View by to Large icons or Small icons, if needed.
- Select File Explorer Options.
- Open the View tab.
- Enable Show hidden files, folders, and drives, then select Apply and OK.
The exact Control Panel layout may vary slightly. This method changes the same visibility setting as the Folder Options method above, so you do not need to use both.
How to Show Hidden Files in Windows 11 Using CMD
Command Prompt is helpful when you want to inspect a directory, search a USB drive, or work with hidden file attributes. It can list hidden items without requiring you to change File Explorer’s display setting.
List Hidden Files with the DIR Command
First, open Command Prompt. You can search for Command Prompt in Start. For a normal file listing, you generally do not need to run it as administrator.
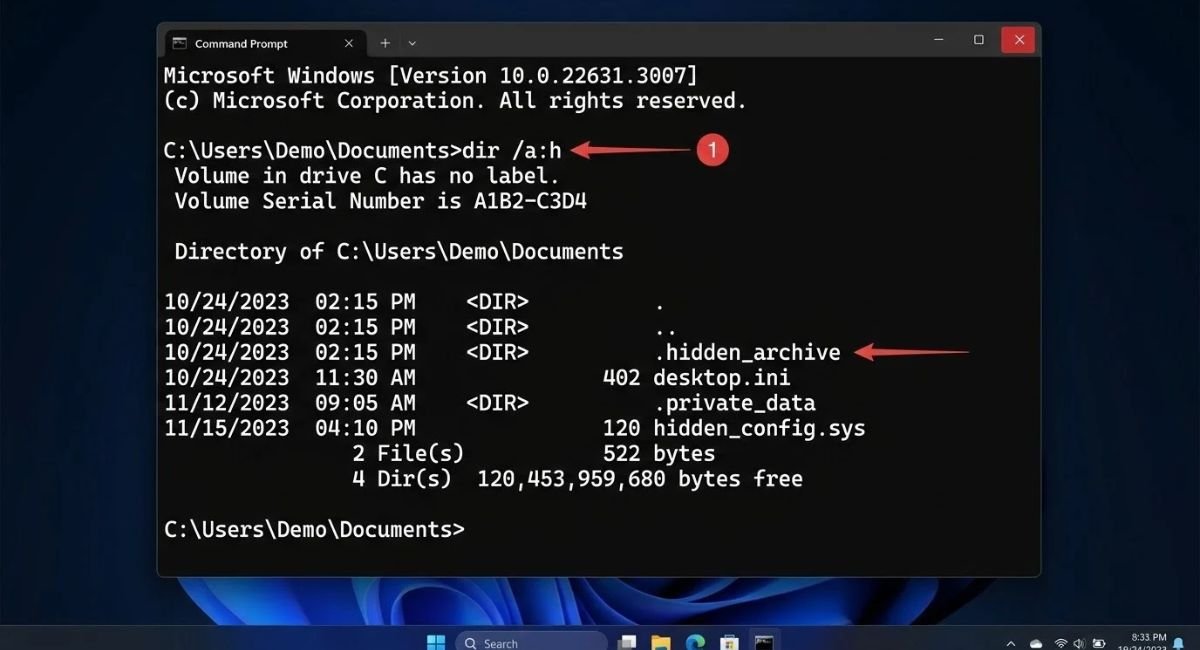
To list hidden items in the current directory, use:
dir /a:hThe /a:h option displays items with the Hidden attribute. It lists entries in the current directory rather than searching every folder on the drive.
To list hidden items in a specific directory, provide its path. For example:
dir "C:\Users\YourName\Documents" /a:hReplace YourName with your actual Windows account folder name.
To search for hidden items in subfolders as well, use:
dir "C:\Users\YourName\Documents" /a:h /sThe /s option searches the specified directory and its subdirectories. A large folder may take some time to scan.
Show Hidden Files and Folders on a Specific Drive
If you know the drive letter, change to that drive before listing its hidden items. For example, if your USB drive is assigned letter E:, enter:
E:
dir /a:h
To include subdirectories:
dir E:\ /a:h /sThis command lists hidden entries; it does not automatically unhide them. If the output is long, check the displayed paths to locate the folder you need.
How to Show Hidden Files in Windows 11 Using PowerShell
PowerShell offers another way to inspect hidden files and folders. It is useful when you need to list items in a specific directory or want more control over a search.
List Hidden Files with Get-ChildItem
Open Start, search for PowerShell or Windows Terminal, and open a PowerShell session.
To list hidden items in the current directory, run:
Get-ChildItem -ForceThe -Force parameter includes hidden items that PowerShell would otherwise omit from the listing. It does not bypass file permissions or grant access to protected content.
To inspect a particular folder, use:
Get-ChildItem -Path "$env:USERPROFILE\Documents" -ForceThis command lists items in your Documents folder, including hidden items.
Show Hidden Files in a Specific Folder Using PowerShell
If you also want to inspect hidden items in subfolders, add -Recurse:
Get-ChildItem -Path "$env:USERPROFILE\Documents" -Force -RecurseUse recursive searches carefully. A folder with many files can produce a large amount of output, and permission restrictions may prevent PowerShell from listing some locations.
PowerShell is a listing tool in these examples. It does not remove the Hidden attribute or change File Explorer settings. Use File Explorer or the appropriate attribute command if you need to make a file permanently visible in normal views.
How to Show Hidden System Files in Windows 11
Ordinary hidden files and protected operating system files are not the same. Windows hides certain system files to reduce the chance of accidental changes. Revealing them is different from enabling the normal Hidden items option.
Enable Protected Operating System Files
If you have a specific reason to inspect protected files, use Folder Options:
- Open File Explorer.
- Select the three-dot menu, then Options.
- Open the View tab.
- Under Advanced settings, find Hide protected operating system files (Recommended).
- Clear the checkbox.
- Read the warning and confirm only if you understand the risk.
- Select Apply and OK.
You may also need to enable Show hidden files, folders, and drives in the same window.
Important: Do not delete, rename, or move protected system files just because they are now visible. Doing so can stop Windows or applications from working correctly. If you only need to find a personal document, leave protected operating system files hidden.
Hide Protected System Files Again for Safety
After checking the files, return to File Explorer Options > View and enable Hide protected operating system files (Recommended) again. Select Apply and OK.
This restores the recommended protection against accidental changes. You can keep ordinary hidden items visible if you still need them; the protected-system-files option is a separate setting.

How to Show Hidden Files on a USB Drive in Windows 11
Files on a USB flash drive may be hidden because someone changed their attributes, the drive was used on another computer, or a software issue affected the files. First, make sure you have selected the correct drive.
Check Hidden Files in File Explorer
- Connect the USB drive to your computer.
- Open File Explorer.
- Select This PC.
- Open the USB drive.
- Select View > Show > Hidden items.
If ordinary hidden files are present, they should now appear in the drive’s folder view. Check any relevant subfolders, too.
Use CMD to Find Hidden USB Files
If File Explorer does not reveal the files, identify the USB drive letter under This PC. Suppose Windows assigns it the letter E:. Open Command Prompt and run:
dir E:\ /a:h /sReplace E: with the correct drive letter. This command lists hidden items on the drive and searches its subdirectories.
If files appear in the listing but not in the normal view, their attributes may explain the difference. If no files appear, they may not have the Hidden attribute, may be missing, or may be inaccessible. Do not format the USB drive if you need to recover its existing contents.
If files disappeared unexpectedly, scan the USB drive with Windows Security and consider reputable recovery software if you suspect deletion. Avoid writing new files to a drive until you have assessed the recovery situation.
How to Unhide a Hidden File or Folder in Windows 11
Turning on Hidden items makes ordinary hidden files visible, but it does not remove the Hidden attribute. If you want a file or folder to remain visible even when hidden items are turned off, remove that attribute.
Remove the Hidden Attribute from Properties
- Enable Hidden items in File Explorer.
- Find the file or folder you want to unhide.
- Right-click it and select Properties.
- On the General tab, clear the Hidden checkbox.
- Select Apply, then OK.
If you are changing a folder, Windows may ask whether to apply the change to that folder only or to its contents and subfolders. Choose carefully based on what you intend to change.
The checkbox may be unavailable for some files or folders, depending on their permissions or location. Do not force changes to protected Windows files just to make them visible.
Unhide Files Using the ATTRIB Command
Command Prompt can remove the Hidden attribute from a specific item. For example, to unhide a file called notes.txt in a folder on drive E:, run:
attrib -h "E:\Folder\notes.txt"Replace the example path with the actual location. The -h option removes the Hidden attribute from the specified file.
For a folder, use its full path:
attrib -h "E:\Folder\MyFolder"This command targets the item you specify. It does not automatically remove the attribute from every file inside the folder. Avoid running broad attribute-changing commands across your entire Windows drive, as this can alter files that should remain hidden.
How to Turn Off Show Hidden Files in Windows 11
When you finish locating the files, you may want to return File Explorer to its usual view.
To hide ordinary hidden items again:
- Open File Explorer.
- Select View.
- Choose Show.
- Clear Hidden items.
Alternatively, open File Explorer Options > View, select Don’t show hidden files, folders, or drives, and click Apply.
This only changes what File Explorer displays. It does not delete the files or restore their Hidden attributes if you previously removed them. If you enabled the display of protected operating system files, turn that option back on separately.
Why Can’t I See Hidden Files in Windows 11?
If you have enabled Hidden items but still cannot find a file, check these common causes before changing advanced settings.
The File May Have the Hidden and System Attributes
A file marked as both hidden and system may not appear when you enable ordinary hidden items alone. If you have a legitimate reason to inspect it, check the protected operating system files setting in Folder Options.
Be careful with system files. Windows hides them for a reason, and changing or deleting them can cause problems.
The File May Have Been Moved or Deleted
A file that does not appear in a folder may have been moved, renamed, or deleted. Check the Recycle Bin, search File Explorer for the filename, and confirm that you are inspecting the correct drive.
If the file was stored on a USB drive, make sure the drive is connected and that Windows has assigned it a drive letter. If you suspect accidental deletion, avoid saving new data to that drive until you decide whether recovery is necessary.
Other possible causes include access restrictions, drive errors, or malicious software. If many files have suddenly disappeared or their names have changed unexpectedly, run a scan with Windows Security before making further changes.
Frequently Asked Questions
1. How Do I Unhide Hidden Files in Windows 11?
Open File Explorer and select View > Show > Hidden items. If you want a particular file to remain visible when this setting is off, right-click it, select Properties, clear the Hidden checkbox, and select Apply. Avoid changing protected system files unless you know why the change is needed.
2. How Do I Locate My Hidden Folder in Windows 11?
Enable View > Show > Hidden items in File Explorer, then browse to the folder where you expect the hidden folder to be. You can also search by its name. If you still cannot find it, confirm the correct drive is connected and check whether the folder was moved or deleted.
3. How Do I Enable Show Hidden Items in Windows 11?
Open File Explorer by pressing Windows + E. Select View, open Show, and select Hidden items. Windows will display ordinary hidden files and folders in File Explorer. Protected operating system files may require a separate setting in Folder Options.
4. How Do I List All Hidden Files Using CMD?
Open Command Prompt and run dir /a:h to list hidden items in the current directory. To include subdirectories on a particular drive, use a command such as dir E:\ /a:h /s, replacing E: with the correct drive letter. The command lists hidden items but does not unhide them.
5. How Do I Show Hidden System Files in Windows 11?
Open File Explorer Options, select the View tab, and clear Hide protected operating system files (Recommended). Confirm the warning only if you need to inspect those files. Turn the option back on when finished, and do not delete or rename protected files without a specific reason.
Conclusion
Finding hidden files in Windows 11 is usually straightforward. For most users, enabling View > Show > Hidden items in File Explorer is all that is needed. Folder Options offers the same basic visibility control, while Command Prompt and PowerShell help list hidden items in specific locations.
If you need to make a file permanently visible, remove its Hidden attribute through Properties or use the attrib command for a specific item. Treat protected system files differently: reveal them only when necessary and restore the recommended setting afterward.
Start with File Explorer, check the correct folder or drive, and use command-line methods only when they offer a clear advantage. This approach helps you find missing items without making unnecessary changes to Windows.
